The total cost of the wall and roof framing, including insulation and vapour barrier, came to $3,458. This level of completion is similar to what a SIP build would be. Back in August 2013 I had estimated that a it would be $3,500, which makes me pretty bang on.
I would have liked to have built with SIPs but the $9,000 to $10,000 quotes where way too much money. Granted I would have been finished the house by now.
All in all I'm happy with my decision to stick build.
Showing posts with label framing. Show all posts
Showing posts with label framing. Show all posts
Tuesday, 27 May 2014

Sunday, 27 April 2014
So its been two months...
The tiny house has been on the back burner for the last couple of months. I decided to focus on school and pretty much everything else was put on the back burner. The last two weeks I've been off so I've put a lot more time into the house and I have a few tasks nearing completion so there should be some big changes in the next few weeks.
I have still accomplished a few things while in school. The bay window is almost done. It have wiring, sheathing, insulation and vapour barrier done. With wiring passing through the bay window I have also been able to finish the wiring and insulation on the last wall.


The vapour barrier on the north wall is mostly done. I just have to pass a few more wires thru it before I can finish.

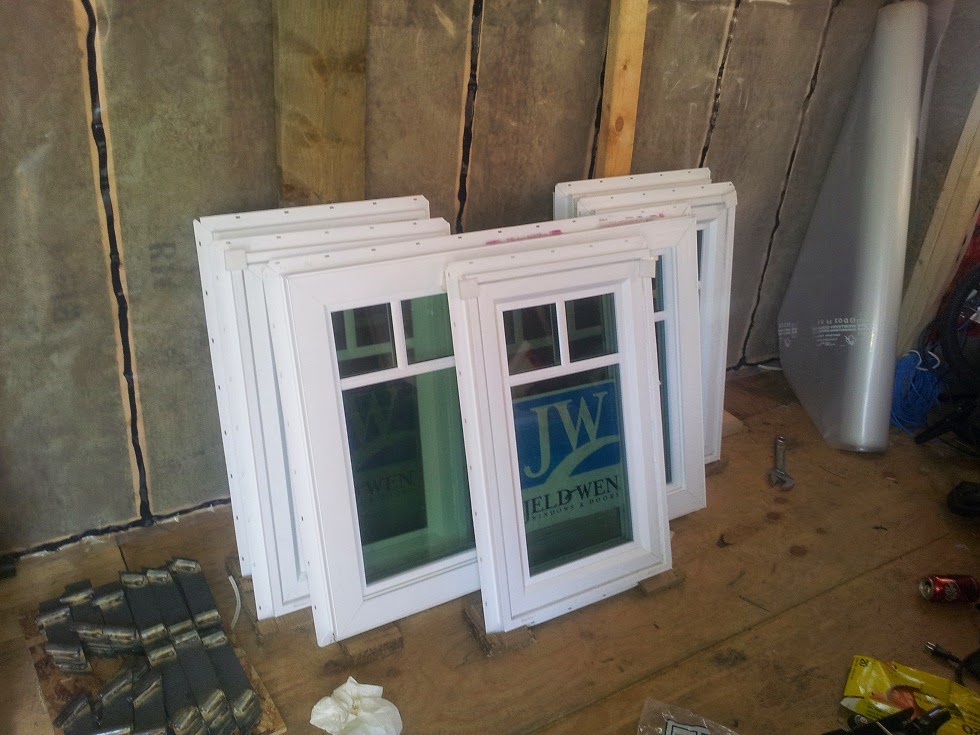
The windows have mostly arrived. There was no packing during shipping so some of the screens where damages. I have to make another trip to the states to pick up the last 3.
I found a store locally that has roofing for the same price as in the states. They have more choice of colours so once that is sorted out then I'll be ordering it. As a bonus they will cut to length for me.
I've been busy the last week fabricating the brackets for the roof extensions. I have spent about 16 hours making the 40 brackets but I think the end result will be worth it.


I've been super geeking out over the performance of my solar setup. It has been producing enough power to keep the welder going without having to run the generator. At one point the panels where producing over 30A even though they are only rated to produce 22A. :)

Expenses to date: $17,014
Thursday, 20 February 2014
The bay window framing
While I was in the states last weekend I looked at doors and windows. This is the door I'm looking at but does it come in red? What do you guys think?


I've been procrastinating on the bay window for a few months but its starting to get in the way. I'm been spending a putting in some time over the past week on making the cuts. There are so many angles and odd measurements that are making it a slow process. I used my brother's band was to make the long vertical cuts which took about 4 hours to setup and run through. With those out of the way I can make the rest of them on my chop saw.
On Tuesday I cut groves for the threaded rod

On Wednesday I framed and erected the front wall.


Today I finished framing the two side walls. I placed them just in time to watch as beautiful sunset. I might put a desk here but I also want to make it a seating area. Later problems :)

Expenses to date: $12,169
Tuesday, 21 January 2014
Wiring and doing things the hard way
The past week has been spent on getting the electrical figured out.
I had originally run all the 15amp AC wiring but I've had to pull it all because it would have exceeded the capacity of the electrical boxes. You can use a box fill calculator to determine the maximum number of wires/devices/clamps that an electrical box can hold. Unfortunately the 14/3 wire means I'll be about 4 cu in over what the boxes can hold. There are two ways to fix this, either use 14/2 and I lose the extra wire, or go with a bigger box. I want to use 3 x 2 x 2.5 boxes so I have 1 1/2" behind the box for insulation so that leaves me with only one option, pulling all the 14/3 out and replacing it with 14/2.
I've also run the wires for solar panels. I was going with a roof mounted panels but now I'm thinking a ground mount might be better. To play it safe I ran wires to both locations.
I'm only running the wires for the exterior walls right now, once the insulation and interior wall is in I'll be finishing up the electrical.

In places where wires might rub against the threaded rod I wrapped rubber tape around the rod.

I've purchased the connections for hooking up to external power and I'll have to do a run down to the states to pick those up. While I'm down there I'll pick up network cable so I can run that and I'll order the Grace Ice and Water Shield for the roof.
I welded the two 1/2" threaded rod that I added in the front corner. Nice to finally cross that off the list.
To finish up the day I attached the four pieces of blocking that the ceiling will be nailed at the gable ends. These should have been put before the roof sheathing was put on but I forgot. It would have been impossible to do without my brother's palm nailer.

Expenses to date: $ 10,981
I had originally run all the 15amp AC wiring but I've had to pull it all because it would have exceeded the capacity of the electrical boxes. You can use a box fill calculator to determine the maximum number of wires/devices/clamps that an electrical box can hold. Unfortunately the 14/3 wire means I'll be about 4 cu in over what the boxes can hold. There are two ways to fix this, either use 14/2 and I lose the extra wire, or go with a bigger box. I want to use 3 x 2 x 2.5 boxes so I have 1 1/2" behind the box for insulation so that leaves me with only one option, pulling all the 14/3 out and replacing it with 14/2.
I've also run the wires for solar panels. I was going with a roof mounted panels but now I'm thinking a ground mount might be better. To play it safe I ran wires to both locations.
I'm only running the wires for the exterior walls right now, once the insulation and interior wall is in I'll be finishing up the electrical.
In places where wires might rub against the threaded rod I wrapped rubber tape around the rod.
I've purchased the connections for hooking up to external power and I'll have to do a run down to the states to pick those up. While I'm down there I'll pick up network cable so I can run that and I'll order the Grace Ice and Water Shield for the roof.
I welded the two 1/2" threaded rod that I added in the front corner. Nice to finally cross that off the list.
To finish up the day I attached the four pieces of blocking that the ceiling will be nailed at the gable ends. These should have been put before the roof sheathing was put on but I forgot. It would have been impossible to do without my brother's palm nailer.
Expenses to date: $ 10,981
Thursday, 21 November 2013
Reflections
Just over a month ago I was just finishing the floor. Now as I'm preparing to put on the roof I think it's amazing how fast it has gone up. This brings me to the reason why I'm keeping this blog. While I'm working on the house progress always seems so slow but going back and reading my old posts constantly reminds me how much progress I have made. If you do build your own tiny house I highly recommend it.
I also managed a to nail the loft walls in place, finally attach the bay window wall to the side walls and clean up.
I also managed a to nail the loft walls in place, finally attach the bay window wall to the side walls and clean up.
Wednesday, 20 November 2013
Finally some sunshine
Last Saturday a classmate lent a hand, we put up some more wall sheathing. That are just a couple of pieces left to put in but they will
have to wait until the roof is done. I also put up the typar on the
bathroom wall to help protect the OSB from water.

I've been using the compressor and saws fairly heavily the last few weeks and combined with the cloudy weather the batteries have been hovering around 50% charge. Today finally provided a full days sunshine bring them up to almost 100%. The best part is sun is in the forecast until at least Sunday. I better make hay while the sun shines!

It may be sunny but it's cold!

Today I put the two loft walls in place! They are not nailed down yet but now the tarps are at the final height of the interior ceiling. The loft feels like it's a good height, even with all the extra wood up there. I was so pleased with the space I just sat for a few minutes and chilled

As you can see it is a bit of a mess. I'll have to make some time to clean it up before the weekend push.

Expenses to date: $8,244 (I returned some screws)
I've been using the compressor and saws fairly heavily the last few weeks and combined with the cloudy weather the batteries have been hovering around 50% charge. Today finally provided a full days sunshine bring them up to almost 100%. The best part is sun is in the forecast until at least Sunday. I better make hay while the sun shines!
It may be sunny but it's cold!
Today I put the two loft walls in place! They are not nailed down yet but now the tarps are at the final height of the interior ceiling. The loft feels like it's a good height, even with all the extra wood up there. I was so pleased with the space I just sat for a few minutes and chilled
As you can see it is a bit of a mess. I'll have to make some time to clean it up before the weekend push.
Expenses to date: $8,244 (I returned some screws)
Sunday, 10 November 2013
Loft floor is done.
The loft floor is 8'1" by 8'4" so I didn't have anywhere big enough to build it. This was my solution and it worked like a charm.

The loft floor in place. I nailed it to the walls once I had it square. In hind sight I should have waited until the walls where squared and plumb.

The tarps sag down more then the roof will but it gives a rough idea of the space and the view out the window.

The messy view from the loft over the living room.

The seams in the subfloor are still wet after last weeks leaky tarp so I knew there was some water sitting underneath. I pulled up the one piece of subfloor that didn't have a wall sitting on it and this is what I found. I wedged the neighboring pieces up, vacuumed up all the water I could get at and left them to dry up.

The loft floor in place. I nailed it to the walls once I had it square. In hind sight I should have waited until the walls where squared and plumb.
The tarps sag down more then the roof will but it gives a rough idea of the space and the view out the window.
The messy view from the loft over the living room.
The seams in the subfloor are still wet after last weeks leaky tarp so I knew there was some water sitting underneath. I pulled up the one piece of subfloor that didn't have a wall sitting on it and this is what I found. I wedged the neighboring pieces up, vacuumed up all the water I could get at and left them to dry up.
Friday, 8 November 2013
Small walls
I swear I saw a man building an ark today.
4 hours later and a little help from a friend the last two walls are up! You can't tell from theses pictures but it feels way roomier now that the tarps are at ceiling height .

I still have to square and sheath them. The bay window wall looks lopsided but it actually is almost square. We spent most of our time fixing this wall and wrestling with the tarps.

Expenses to date: $7,879
Friday, 1 November 2013
Framing the last walls
What a busy day!
My friend came over again today and I replaced the fuel pump on her truck. After a quick break we got right to work on the house. We place the two shear panels at the bathroom end (glued and nailed). Next we cut all the lumber for the bay window wall, no mistakes this time, I'm almost getting good at this! We laid everything out and nailed most of it in place before calling it a night.
Here you can see the two end walls. The bathroom wall is the bottom one.
 Since starting the walls the deck has been pretty messy. I'm looking forward to having the loft floor so I can store the extra materials.
 The tarps are held in place with 2x4s on the ends. They weigh down the tarps and slowly pull them tighter. This system works better then using ropes because it doesn't allow any water to collect on the roof even on the flat section. A second benefit is it creates an overhang so the water clears the floor.

My friend came over again today and I replaced the fuel pump on her truck. After a quick break we got right to work on the house. We place the two shear panels at the bathroom end (glued and nailed). Next we cut all the lumber for the bay window wall, no mistakes this time, I'm almost getting good at this! We laid everything out and nailed most of it in place before calling it a night.
Here you can see the two end walls. The bathroom wall is the bottom one.
Thursday, 31 October 2013
Left wall is framed
I've been working hard pushing to get the walls up before the drop in temperature that is expected on Saturday. Recently the highs have been around 10C (50F), cool but once you get working it is pretty nice. Starting this weekend the highs will around 2C (36F) which is a lot less pleasant to work in. and if I can start putting plywood on then I can heat it.
With the house tarped over there is a good amount of covered space to work so I putting in an hour or two in after I come home from school. Today a friend come over to help me, we managed to completely frame the exterior bathroom wall, we finished well after dark but it was a warm evening despite a little rain.
Expenses to date: $7,812
With the house tarped over there is a good amount of covered space to work so I putting in an hour or two in after I come home from school. Today a friend come over to help me, we managed to completely frame the exterior bathroom wall, we finished well after dark but it was a warm evening despite a little rain.
Expenses to date: $7,812
Saturday, 26 October 2013
I have walls!
Today I was like a kid in a candy store. I've been looking forward to this stage for weeks, maybe even months.
The first wall is on the bottom, you can see the stacked lumber that is supporting it. This was to raise the wall high enough to clear the wheel wells when flat. Next some plywood was laid down just to have a work surface for the second wall.

One of my classmates organized a build day for me and 6 people showed up to lend a hand. I had a really hard time keeping ahead so I could have their next job ready for them. We framed the rear wall with only two minor mistakes. Like I said I was running around like a chicken with my head cut off.

Finishing touches on the second wall!


Since it's hard to get so many people together at once we decided to put the two completed walls up before the end wall where build. It took a lot of muscle to lift the walls onto the threaded rods but we got them on. The best part is everything fit perfectly! We even managed to put the tarps over it to ward off tomorrows rain.
Expenses to date $7,781
The first wall is on the bottom, you can see the stacked lumber that is supporting it. This was to raise the wall high enough to clear the wheel wells when flat. Next some plywood was laid down just to have a work surface for the second wall.
One of my classmates organized a build day for me and 6 people showed up to lend a hand. I had a really hard time keeping ahead so I could have their next job ready for them. We framed the rear wall with only two minor mistakes. Like I said I was running around like a chicken with my head cut off.
Finishing touches on the second wall!
Since it's hard to get so many people together at once we decided to put the two completed walls up before the end wall where build. It took a lot of muscle to lift the walls onto the threaded rods but we got them on. The best part is everything fit perfectly! We even managed to put the tarps over it to ward off tomorrows rain.
Expenses to date $7,781
Sunday, 20 October 2013
Framing the front wall
The first thing I did on Saturday was pick up threaded rod. This took a trip to 4 different stores before I realized I was looking for the wrong size. I replaced the 4 rods around the wheel well and reassembled the floor. Next I continued to cut the studs and headers. I even nailed together the bathroom area of the wall.
 Today a friend come over to lend a hand so I wanted enough building materials around so I did an early morning run to pick up the lumber for the rear wall. The front wall has 4 windows, the door, two different top plate heights and the span over the wheels. A lot of different sized lumber and plenty of cuts. With my helper we made great progress, unfortunately when I made the wheel well header I cut it 6" too short. Good thing I had the spare lumber.
By the end of the day we had almost completed the wall, there is just the area around the kitchen window to frame.
Expenses to date: $7,298
Today a friend come over to lend a hand so I wanted enough building materials around so I did an early morning run to pick up the lumber for the rear wall. The front wall has 4 windows, the door, two different top plate heights and the span over the wheels. A lot of different sized lumber and plenty of cuts. With my helper we made great progress, unfortunately when I made the wheel well header I cut it 6" too short. Good thing I had the spare lumber.By the end of the day we had almost completed the wall, there is just the area around the kitchen window to frame.
Expenses to date: $7,298
Friday, 18 October 2013
Starting the walls
The floor over the right rear out rigger had to be fixed. I had problems with this side being too low during construction and I had fixed it. It turns out the joists in the main part of the floor just where not fully seated. I pulled it apart on Thursday and pretty much rebuilt it. After the reassembly today it is pretty close to perfect.
I picked up the Bostitch F28WW nail gun yesterday for a steal. I local tools store had it on sale this month for $50 off. When I checked their web site last night is was an additional $20 off. I then price matched this at Rona for another $7 off. :-)
 I've been excited about starting the walls for a while for a while and it is finally and today I finally got a start. So far I've just cut out studs for the area below the loft but by tomorrow I should be well on my way.
One more thing I need to fix before I get too far into the walls is the threaded rods next the wheel well have to be replaced with longer one. By doing this they will come up through the header for the wheel well providing a secure hold down.
Expenses to date: $ 7,157
I picked up the Bostitch F28WW nail gun yesterday for a steal. I local tools store had it on sale this month for $50 off. When I checked their web site last night is was an additional $20 off. I then price matched this at Rona for another $7 off. :-)
I've been excited about starting the walls for a while for a while and it is finally and today I finally got a start. So far I've just cut out studs for the area below the loft but by tomorrow I should be well on my way.One more thing I need to fix before I get too far into the walls is the threaded rods next the wheel well have to be replaced with longer one. By doing this they will come up through the header for the wheel well providing a secure hold down.
Expenses to date: $ 7,157
Subscribe to:
Posts (Atom)