Showing posts with label lesson learned. Show all posts

Tuesday, 21 January 2014

Wiring and doing things the hard way

The past week has been spent on getting the electrical figured out.

I had originally run all the 15amp AC wiring but I've had to pull it all because it would have exceeded the capacity of the electrical boxes.  You can use a box fill calculator to determine the maximum number of wires/devices/clamps that an electrical box can hold.  Unfortunately the 14/3 wire means I'll be about 4 cu in over what the boxes can hold.  There are two ways to fix this, either use 14/2 and I lose the extra wire, or go with a bigger box.  I want to use 3 x 2 x 2.5 boxes so I have 1 1/2" behind the box for insulation so that leaves me with only one option, pulling all the 14/3 out and replacing it with 14/2.

I've also run the wires for solar panels.  I was going with a roof mounted panels but now I'm thinking a ground mount might be better.  To play it safe I ran wires to both locations.

I'm only running the wires for the exterior walls right now, once the insulation and interior wall is in I'll be finishing up the electrical.

In places where wires might rub against the threaded rod I wrapped rubber tape around the rod.


I've purchased the connections for hooking up to external power and I'll have to do a run down to the states to pick those up.  While I'm down there I'll pick up network cable so I can run that and I'll order the Grace Ice and Water Shield for the roof.

I welded the two 1/2" threaded rod that I added in the front corner.  Nice to finally cross that off the list.

To finish up the day I attached the four pieces of blocking that the ceiling will be nailed at the gable ends.  These should have been put before the roof sheathing was put on but I forgot.  It would have been impossible to do without my brother's palm nailer.


Expenses to date: $ 10,981

Saturday, 11 January 2014

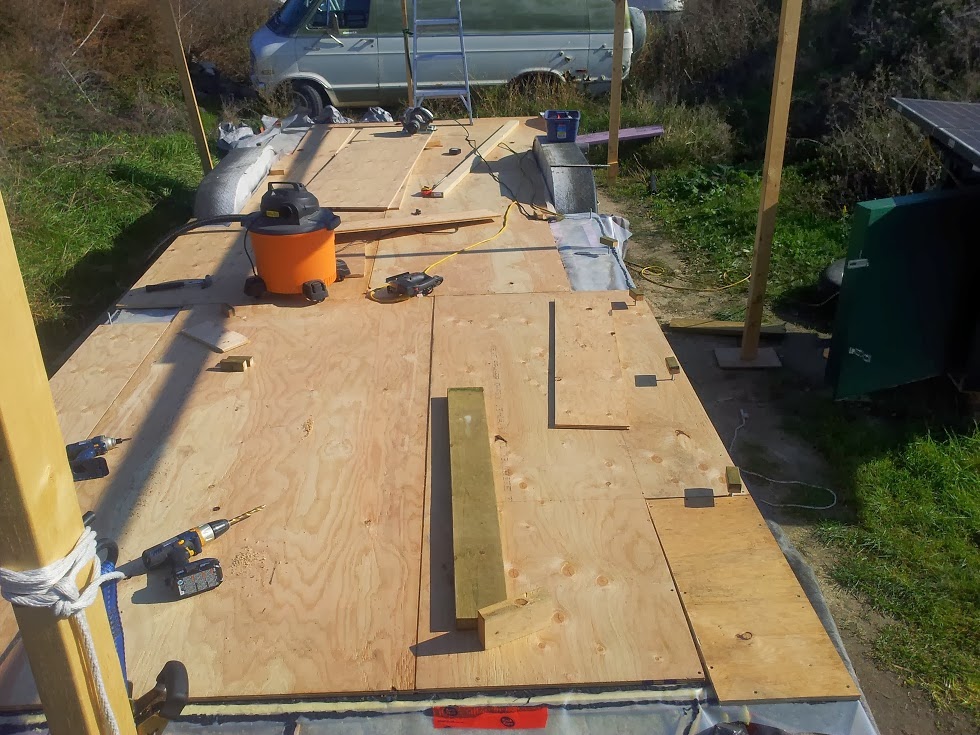
Collar ties and almost done the roof sheating

With a help from my friend I had productive Saturday.  We had a beautiful, warm sunny day so we decided to tackle the rest of the roof.  The first then I did was cut the notches out for the last two outriggers for where the loft roof hangs out over the main roof.  I should have done it before putting them up.  It is no fun trying to hold a circular saw sideways in a tight area.

Moving on to the sheathing.  It took a while to figure out the layout so I could cover it with the four sheets that I had left. Well it turns out that I didn't do the math right and I'm just a 2'x3' shy of finishing it.

The last thing we finished up was putting the collar ties up for the main roof.  We put up the first and last one and then used a string between the two so the rest lined up even if the height/level was wrong.


Wednesday, 25 December 2013

Merry xmas

I hope everyone is having a great xmas!

Ordered the furnace, hot water tank, propane hoses and regulator.  They have been delivered to a shipping outlet just south of the border.  I also ordered and received some LED strip lighting but I was less then impressed so I ordered a different kind.

I bought the inverter that I talked about at the beginning of the month (Magnum MS4448PAE) .  It turns out he ordered it for a project but it fell through.  The seal on the box wasn't even broken.  I saved about $800 plus shipping taxes and duties.  Unfortunately he didn't want the outboard but I did get in running and I'll sell it in the spring.  Now I just need 16 batteries, more solar panels and a better charge controller.  I'll be breaking the cost of the solar system out of the running total due to it heavily skewing the cost of the tiny house.


Now that the sheathing is done I had help from a classmate and a roommate to help put the Typar up.  After about a thousand staples it is securely attached.  I left out a row or two around every opening, this is so i can come back later and flash them.


The threaded rod is installed everywhere. I cleaned out a couple of stores and found out it pays to shop around.  Here is what I paid at each location for 10' lengths (except HD which was 6')


       1/2"          3/8"
Home Depot
6.50
Princess auto      11.19 6.14
OK Building
5.88
BC Fasteners        5.47 2.52

I wish I had known about BC fasteners first, I would have saved about $80.  Granted it would have been a lower quality zinc plating but they will not be exposed to water anyway.


The Strong Ties are installed on almost all the rafters, just the first couple rafters to finish.  I also installed the outriggers for the loft gable end.


The friend that has been lending a hand from time to time was in town so we loaded out her truck with all the scrap wood.  The side and interior are much tidier now.


Expenses to date: $8,924


Sunday, 24 November 2013

Putting up the rafters

Friday
I started by pulling the tarps off the roof.  It was nice working in the sun but the wind was chilly.  Next, I notched the birds eye for the loft rafters and started the living room rafters.  I wound down the day with a shopping trip!  I haven't yet nailed the walls to the floor.  Because the rim boards are pressure treated I didn't want to use regular nails and wasn't sure what kind to get.  After asking a couple of Home Depot employees who had no clue I turned to the internet and sure enough you have to use a Hot Dipped Galvanized nail.


Sat
Once again I had a helper, my friend has been kind enough to come into town again.  We started by marking the location of the rafters on the ridge boards and top plates.  This greatly simplified the installation.  Next we nailed and screwed the rafter ties in place.  These do leave a gap between the ridge board and rafter so if you do use them makes sure you take this into account.  I didn't and so the rafters stick out a little extra.  We managed to get all the loft rafters in place and the first living room rafter in.


Sun
I finished cutting all the birds eyes and then my helper showed up.  I had her start on cutting some of the missing wall sheathing while I installed the remaining rafters.  I used a couple of 2x4s and some plywood to make a platform to sit on top of the walls so I could have somewhere to stand.  To keep it from falling off the walls I nailed a couple of wood blocks to act as guides, it worked great.  After the rafters where up we realized there was not enough sheathing to finish the walls so we knocked off early and did a Home Depot run.  While we where there we picked up the roof sheathing too.  When we got back the sun was going down so we just unloaded and put the tarps up.


Expenses to date: $8,932

Thursday, 14 November 2013

Sawdust and Loft walls

Today and yesterday where busy days.  Between classes on Wednesday I picked up the wood for the rafters and ridge boards.  In the evening I went over to my brother's and cut all the rafters.  He has a very fancy siding compound miter saw that I needed to cut the 10" rafters for over the living room.  I decided to go with 24" O.C. over the living room with 5/8" TG plywood.  This will save about $80 and 100 lbs.  The loft will be 16 O.C. for two reasons; it only has a 15 degree pitch and I'm only using 8" rafters.

I started today putting the vapour barrier between the loft floor and bathroom wall.  It was an interesting job because I had to put the acoustic sealant between the studs and vapour barrier.  In hind sight I should have done this before I put the loft floor in. Next I put the subfloor back down after letting it dry out for the last week.  I spent the evening putting together the two loft walls.

Expenses to date: $8,294

Sunday, 10 November 2013

Loft floor is done.

The loft floor is 8'1" by 8'4" so I didn't have anywhere big enough to build it.  This was my solution and it worked like a charm.

The loft floor in place.  I nailed it to the walls once I had it square.  In hind sight I should have waited until the walls where squared and plumb.

The tarps sag down more then the roof will but it gives a rough idea of the space and the view out the window.

The messy view from the loft over the living room.

The seams in the subfloor are still wet after last weeks leaky tarp so I knew there was some water sitting underneath.  I pulled up the one piece of subfloor that didn't have a wall sitting on it and this is what I found.  I wedged the neighboring pieces up, vacuumed up all the water I could get at and left them to dry up.


Monday, 14 October 2013

Winter is coming! (and all about nails)

This morning I was out of the house early to meet some out-of-town friends and I was greeted by the most unpleasant sight.

Yup at 8:30am my motorcycle seat was still covered in a heavy frost.  How I wish I had walls.  By the time I returned at 10:30 the frost on the tiny house had melted but there was so much water that it looked like it had rained.

I spent a relaxing day working on the house.  The sub floor is almost done, I just have two 13" x 49" pieces to install.  I had to run to the lumber yard to pick up another sheet of plywood to finish it off.  I figured while I was there I should pick up the lumber for the first wall.  This led me to research fasteners.

Warning long winded, slightly technical but important topic ahead 

Basically the internet says screws are too brittle, they snap when bent and they don't come in a big enough diameter.  Fair enough, I've already seen this while straining the joists.  Off I go to buy a nail gun and the lumber.  Later that night it pops into my head that the nails for the gun looked a little thin too.  Many web pages latter I come across this nugget.  The nails for my gun (and most guns sold in town) are .120" in diameter and I would have to use 4 nails for the top and bottom of each stud.  I don't think the lumber would hold up to that abuse.  Further research leads me to the Bostitch F28WW nail gun which can take a nail with a .131 diameter and I would only need 3 nails.  Seriously who knew that attaching two pieces of wood together could be so complicated.

Now back to pictures!

The bay window  sub floor is finish too.
I also leveled the trailer and put the Stack Jacks in place.

Saturday, 5 October 2013

Just a little rant about vapour barrier.

After the last storm I went back to the low slung tarp setup.  It continued to rain for the next 3 days but the rock wool still managed to dry out under the tarps.  On Thursday I install the remaining batts.  An important note, I did not put any insulation on top of the sewer pipe, this is to minimize the risk of them freezing in the winter.  Because of the extra 2" drop in this part of the floor the pipe have between R12 and R22 underneath them.  Friday I had a friend giving me a hand.  We installed the foam board insulation over the frame, the 1 1/2" board gives a nice R value of 10.  We also put the 6 mil vapour barrier down.  I just have to tape where the pipes pass through the plastic and staple the edges down.  Next stop sub floor!

This is one of the few things I have to rant about.  I've seen how this is handled in most parts of the states and it is shit.  The vapour barrier is usually little more then tar paper stapled to the studs.  I'm not even sure what the point is of wasting staples on that.  Here in Canada the only accepted way is 6 mil plastic sheets.  It comes in 100' x 10' rolls so you can do a whole wall with no seams and lots of room for overlap.  I took it one step further and used acoustic sealant on all the joists.  Acoustic sealant is gooey tar that never dries.  When I screw the sub floor down the acoustic sealant will seal the screw holes.
Rant off


Expenses to date: $6,461

Sunday, 29 September 2013

Vacuuming insulation

Around 11 last night we had a storm come through.  The shelter was flexing significantly so I had to pull the tarps down and recover the trailer.  All the insulation got rained on while I was doing this.  Luckily the rock wool is hydrophobic.  This morning I vacuumed up the water that was still sitting on the batts and the little that had soaked in.  Had this been fiberglass I would be pulling it all out and replacing it.

Saturday, 28 September 2013

Insulating the floor

First as promised, my sketchy rain shelter.  It won't stand up to snow but the roof should be on before then.  The center beam is made up of two 2x4x14s butted up end to end and a 2x4x8 spanning the joint.  Hopefully there is no wind.

It was pretty hairy putting this up and it included almost having the main beam dropping onto the solar panels.  It will be a lot easier taking it down.


I spent Friday and today putting the insulation in for the floor.  My first choice was wool from Oregon Shepard but they didn't reply to my inquiries.  I ended up going with rock wool and here are my reasons:
  • loose fill has a lower R-value per inch
  • loose fill has to fluffed up
  • fiberglass is itchy and has a slightly lower R-value
  • rock wool is pretty dense and will probably resist settling and shifting
  • rock wool is fairly water resistant
  • rock wool was $220 vs fiberglass $130

My little spreadsheet to help my choice


Floor insulation


Cubic ft needed 92


ruxul loose ruxal batt FG loose FG batt Cellulose
Coverage/pkg in cubic feet 22.49 18.24 56.63 35.89 18.12
Cost/pkg 34.47 36.38 36.20 43.66 14.22
Weight/pkg 33.00 42.10 30.00 29.90 25.35


R/inch 2.82 4.00 2.70 3.64 3.33


Weight/cu ft (lbs) 1.47 2.31 0.53 0.83 1.40
Cost/cu ft 1.53 1.99 0.64 1.22 0.78
Cost/R 0.045 0.042 0.020 0.028 0.020


Weight total (lbs) 134.51 211.56 48.57 76.37 128.24
Bags needed 5.00 6.00 2.00 3.00 6.00
Cost 172.35 218.28 72.40 130.98 85.32


Now the fun part, installing it.  I wore long sleeves, leather gloves and a mask.  Rock wool is nowhere near as itchy as fiberglass and it washes off much easier.  I found it would give slivers without the gloves. I've finished installing 3 1/2 bags out of five.


Wednesday, 11 September 2013

More posts coming soon

I'll be soon back to work on the house but here is a little summary of the past 3 weeks.

First, I got a second quote for the SIPs and it was $9000 with taxes in, about the same price as the other quote.  As much as I would like to use SIPs, I can't justify spending and extra 4-5,000 on them.  Now I have to rework the plans to go with a conventional stick build.

Second, I spent 5 days on my motorcycle touring around Washington state and Victoria island.  It was awesome.

Third, I started school!

Finally, I sold my 28 foot toy hauler and had to drive it to Edmonton to meet the buyer.  With school and building the tiny house eating up a lot of cash the sale gives me a good buffer.

Two small updates.  I was given a second induction cook top for free!  I just bought a used 2500 pure sine wave inverter for 225!  Now I can run all the tools off the battery bank.

Expenses to date: $6,019

Here is my spreadsheet of expenses


Trailer 3410
Framing 907
Tool 800
Appliances 315
Electrical 225
Siding 141
Batt box 129
Plumbing 93


Date
Description Store Category 6019.52


18-May
Trailer Castanet Trailer  2,800.00
3-Jun
Grinding discs Princess auto Tool       13.42
9-Jun
Caulk gun Home Depot Tool       68.59
15-Jun
Lumber floor joists Home Depot Framing     103.34
15-Jun
Tools Princess auto Tool       78.92
15-Jun
Metal Spartan Metal Trailer     350.00
18-Jun
OSB - floor bottom Home Depot Framing     119.56
18-Jun
Flashing floor bottom Home Depot Framing     144.48
18-Jun
PL premium Home Depot Framing       11.85
18-Jun
Mason Line Home Depot Tool        5.03
23-Jun
Plywood sub floor Home Depot Framing     174.38
23-Jun
2x4s Home Depot Framing       19.62
23-Jun
Spray paint gun Princess auto Trailer       22.39
24-Jun
Battery Tub Walmart Batt Box       16.80
29-Jun
Battery box paint Canadian Tire Batt Box       37.61
29-Jun
Strong ties, vent Home Depot Batt Box       14.68
29-Jun
Trailer Paint Home Depot Trailer       51.00
4-Jul
Battery box security Home Depot Batt Box       37.34
8-Jul
Welding supplies Reliable welding  Trailer        2.20
8-Jul
Welding magnet Summit tools Trailer        2.21
9-Jul
Welding supplies Princess auto Trailer        7.86
10-Jul
Welding gas Praxair Trailer       71.11
10-Jul
Welding wire Princess auto Trailer       33.59
11-Jul
Paint supplies Home Depot Batt Box       11.70
11-Jul
Screws Home Depot Framing       56.50
11-Jul
PL premium Home Depot Framing       11.85
11-Jul
Gerry Can 10L Canadian Tire Tool       10.07
11-Jul
Generator 3500W Home Depot Tool     446.88
12-Jul
Gas Chevron Tool       13.00
12-Jul
Compressor oil Princess auto Tool       14.55
14-Jul
Induction cook top Walmart Appliances       90.98
20-Jul
PT lumber Home Depot Framing       32.08
20-Jul
PL premium Home Depot Framing       11.85
24-Jul
Dishwasher London drugs Appliances     223.99
27-Jul
Screws Home Depot Framing       23.95
27-Jul
Lumber Home Depot Framing       44.65
27-Jul
10" miter saw Home Depot Tool     113.96
27-Jul
Wasp killer Home Depot Tool        7.71
29-Jul
Wheel bearings Lordco Trailer       69.68
4-Aug
PT lumber Home Depot Framing        8.02
5-Aug
Waste plumbing Home Depot Plumbing       84.38
6-Aug
Tie downs Home Depot Framing       41.48
8-Aug
PT lumber Home Depot Framing       22.76
8-Aug
PT lumber Home Depot Framing       11.73
9-Aug
Waste plumbing Home Depot Plumbing        7.43
13-Aug
Screws Home Depot Framing       25.94
15-Aug
Squeegee Canadian Tire Batt Box       11.19
15-Aug
House wrap Home Hardware Siding     141.10
15-Aug
Staples Canadian Tire Tool        4.80
15-Aug
Sharpie Superstore Tool        5.59
16-Aug
Bolt Home Depot Framing        0.62
16-Aug
Sewage coupling Home Depot Plumbing        1.11
26-Aug
Stack Jacks Walmart Framing       41.99
1-Sep
Staple gun Canadian Tire Tool       35.27
1-Sep
Plumbing returns Home Depot Tool      (18.26)
11-Sep
Prosine 2.5 Castanet Electrical     225.00

Wednesday, 21 August 2013

Why I did not build with SIPs.

I got the estimate back for the SIPs yesterday.  I expected it to be in the 3,000 to 5,000 range.  I opened the email and saw $9,200!!!! =O

This morning I called another company, they where nice enough to give me some numbers so I could ball park the cost.  This time it came to about $7,000 with a 6 to 8 week delivery time.  (Edit this second estimated ending up being $9,500)

I did up a spread sheet to estimate how much a stick build would cost.  I included sheathing, framing, insulation, vapor barrier and a large cushion. My estimate is $3500.

I love spreadsheets.

I've been using one to track my expenses so I just added a few numbers for the siding and windows to get my "dry in" price.  With SIPs I would be around $19,000, stick build $15,500.  Add on plumbing, electrical, cabinets and it starts to add up.  Granted I'll have more time to look for bargains which would help.

Friday, 9 August 2013

All squared up

After pulling all the screws my roommate came out and helped me square up the frame.  The strap in the picture is tightened which in turn shortens the long diagonal.  The final result after everything was screwed back down... drum roll please ... 288 1/4" to 288 3/8" or withing 2/16".  Woo hoo, it only took 5 hours to fix.
In the afternoon I shortened the left rear and right front outriggers and moved the anchor holds on the right rear.  The adjustment ended up changing the dimensions by 1/4 to 1/2".

The past few days have all been sunny and 32 to 35C and this evening was no exception.  I glanced at the weather forecast and saw it might rain, I was tired from the long days but I still tarped everything over.  The next morning it rained buckets for about 30 minutes, moral of the story, always check the forecast.


Expenses to date $5,545

Thursday, 8 August 2013

Fixing day!

The first thing I did today was go out and buy a 2x6x12' pressure treated board and some shims.  On the way back I swung by my bother's and picked up his table saw.  I shimmed up the 2nd last board to the proper height and marked the 2x6 on both sides.  A quick snap of the chalk line and then I ran it thru the table saw.  Now the floor is pretty close to level!  The left rear outrigger how ever is good at the front but out at the back, another quick run to Home Depot for a 2x8 :-(  This time I had to use the circular saw to make up for the slant on the board.  I don't know what I was thinking when I did the welding on that side.
In the afternoon I measured the diagonals to make sure the whole structure is a square and not a trapezoid.  One diagonal was 288" and the other is 289", a quick check with Google and I came across this:

 Handbook of Construction Tolerances by David Kent (McGraw-Hill) lists hundreds of suggested tolerances for various phases of construction.

According to the Handbook , horizontal building layout (including the foundation) involves both dimensional accuracy and squareness. For measurements less than 10 feet, the tolerance is 1/8 inch; between 10 and 100 feet, it’s 1/4 inch (see illustration, below). For squareness, the tolerance for the dimension of the 5-leg in a 3-4-5 triangle measured with a steel tape is 3/4 inch in 100 feet. Use the same ratio for diagonals of less than 100 feet. For example, when measuring a 50-foot diagonal, the acceptable tolerance would be 3/8 inch (one-half the tolerance for the 100-foot diagonal).

Foundations walls should be level within 1/4 inch in 10 feet, while the entire foundation should be level within 1/2 inch.

The Handbook states that there is no single accepted tolerance for rough framing, although a tolerance of 1/4 inch in 10 feet is frequently used and is acceptable. The second edition of Standards for the Professional Remodeler (NAHB Remodelors Council, available from the NAHB Bookstore at 800/223-2665) requires that walls and floors be plumb and level within 1/4 inch in 32 inches. This seems overly generous when you consider that it would allow an 8-foot wall to be up to 3/4 inch out of plumb.

So on my 24' diagonals I was allowed to be out 3/16 of an inch from each other, I'm at 1".  I'm going to have to pull all the screws and plywood, square it up and re-screw it.  Crap.

Expenses to date $,538

Friday, 12 July 2013

Fire!

I started the morning with a second coat on the battery box.  Next I cut a couple of pieces of metal that I had forgot to put on and in doing so started a fire!  Luckily I caught it in time and stamped it out.  It was a reminder just how dry it is and how far away water is.  I welded on the 2 pieces and was checking every two seconds to see if I started another fire.  Just a little paranoid now :)  The rest of the day was spent spray painting the trailer mat black.  It looks pretty sweet!

Not much left to do on the trailer frame, just a second coat and bolts to secure the house.


Expenses to date $4,751

Tuesday, 9 July 2013

Fixing the welder setup

I ran errands in the morning.  Last time I had said my welds where better but I'm still not happy with them.  I'm doing MIG welding and the way it works is a small steel wire passes thru a copper tip.  The copper tip electrifies the steel which then arcs to the pieces of metal I am welding.  I decide to pick up a new tip to see if it helps, it turns out the size of the hole in the tip I was using was 0.005" too large.  When I put the proper size tip on it was like night and day.  I spent the rest of the day redoing some of previous welds and a couple of new ones.

Expenses to date $4,081